Laser scanning confocal microscopes are nondestructive, provide single-nanometer resolution
Electrodes are essential components of modern lithium-ion batteries, which are used to power mobile electronic devices, electric vehicles, and many other products. The battery’s surface structure and engineering are directly related to its performance, life expectancy, and safety.
The batteries are manufactured using advanced fabrication technologies, and their quality must be checked to help ensure they are being made correctly. In particular, the surface roughness of the battery’s electrodes must be strictly controlled. Inspecting lithium-ion battery electrodes can be challenging but using a laser confocal microscope enables manufacturers to overcome these challenges to help ensure the quality of their products.
Electrodes vital to battery safety
Thanks to advances in nanoscience and materials engineering, lithium-ion batteries have improved dramatically in the last decade. These advances have changed our everyday life in communication, entertainment, and transportation. Batteries in our smartphones and laptop computers have become more compact and lightweight. Today, these devices can be easily transported and have enough power to last for many hours. In addition, zero-emission electric vehicles powered by lithium-ion batteries are becoming an increasingly popular choice among consumers.
The electrodes are an important part of a lithium-ion battery. Electrodes are the gatekeepers of the electron flow process. They affect many aspects of the battery’s performance, including how fast the electrons discharge, how long it takes to recharge the battery, and how many charge-discharge cycles each battery is capable of. Electrodes are also vital to the battery’s overall safety. The electrodes must remain cool during charging and discharging so that they do not catch on fire. All these aspects of lithium-ion batteries strongly depend on the electrode’s surface and interface structure design at the nanometer level.
The very small structures on the electrode’s surface create practical challenges for manufacturers. Not only do manufacturers have to tightly integrate microdevices and nanomaterials together in the final battery assembly, but they also have to inspect these nanostructures during and after the manufacturing process. However, due to the sensitivity and fragility of these microstructures, conducting an inspection without damaging them is very difficult. Quality assurance professionals require noncontact inspection tools capable of single-nanometer-level resolution that can operate in the special environmental requirements associated with lithium-ion battery manufacturing, such as low humidity.
Laser scanning confocal microscopes
Laser scanning confocal microscopes are part of metrology inspection systems widely used for quality control during electronic device manufacturing. For lithium-ion battery electrodes, it is important to choose a microscope that offers the following advantages:
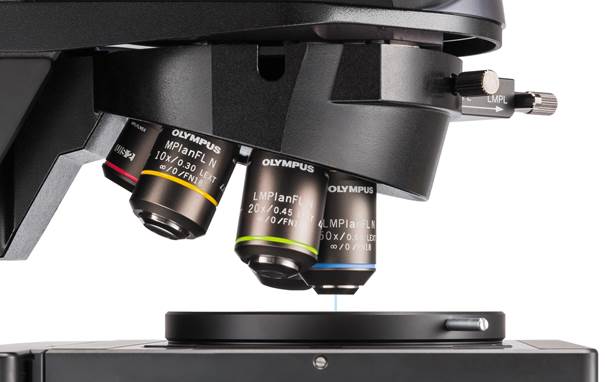
Accuracy: Laser confocal microscopes with dedicated objectives for surface roughness enable users to achieve single-nanometer resolution while providing accurate measurements (figure 1).
Noncontact: These microscopes use a laser to probe the electrode’s surface, so it does not damage or alter the structure.
Accommodates a range of samples: Some laser confocal microscopes offer different frame configurations to handle a wide variety of samples.
Easy to use: High-quality confocal microscopes have built-in automation functions that make analysis fast and efficient.
A microscope with these advantages will have the features necessary to inspect lithium-ion battery electrodes. Below, we discuss two examples using the Olympus LEXT OLS5000 laser confocal microscope to inspect lithium-ion batteries during backend assembly. These studies demonstrate the value a laser scanning microscope has for battery manufacturers.

Figure 1: Using objectives designed specifically for surface metrology helps users obtain highly accurate data. |
Measuring surface roughness Li-ion battery electrodes
The positive (cathode) and negative (anode) sides of a lithium-ion (aka Li-ion) battery are kept apart by a separator material. An electrode sheet made of carbon nanoparticles or graphene flakes adheres to the separator. To adhere correctly, the sheet must have the proper surface roughness. Because they are made of carbon, the sheet’s surface is black, making it challenging to assess the roughness using a conventional optical inspection system, such as an optical microscope or scanning interferometer.
Since confocal microscopes use a laser to measure surface roughness, it minimizes the risk of causing damage to the electrode. Even though the electrode is black and has low reflectivity, a laser scanning microscope can capture even a weak reflection and use it to build a detailed 3D height map.
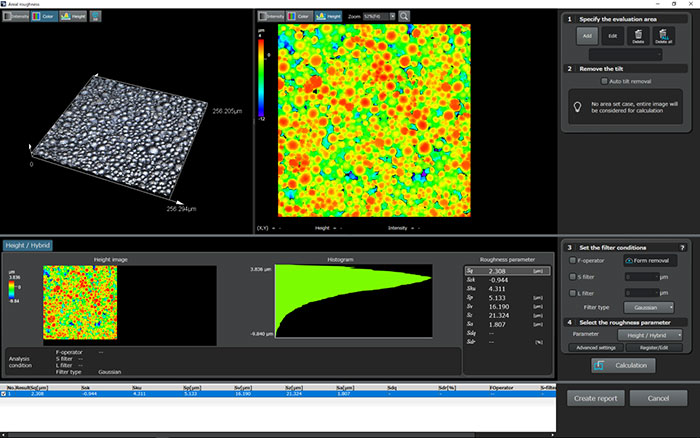
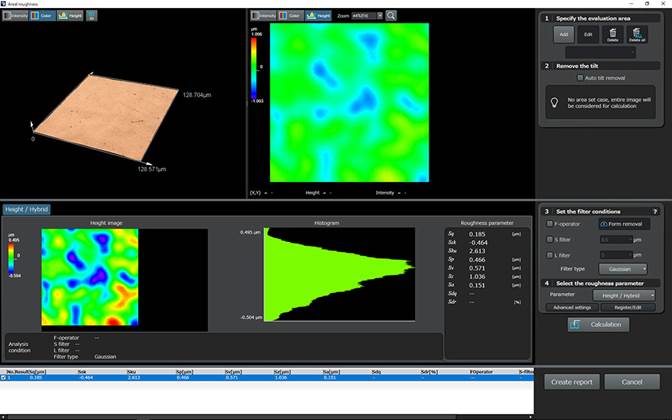
Using objective lenses designed specifically for surface metrology, we acquired accurate 3D data of the electrode’s surface across the microscope’s entire field of view. We then used the software’s image-stitching mode to combine multiple images into a single stitched image of a wide area (figures 2 and 3).
The microscope’s roughness measurement feature enabled us to simultaneously observe the sample’s 3D height information captured by the laser and the color images captured by the system’s optics. For an inspector, being able to access these two types of complementary information enable a better understanding of the electrode’s surface.

Figure 2: The surface roughness of an anode electrode.
Figure 3: The surface roughness of a cathode electrode. |
Measuring surface roughness of Li-ion battery current collectors
Current collectors are essential components of a lithium-ion battery. They both hold back the active substance in the battery (the electrode material) and help ensure a uniform distribution of current in the electrode. In lithium-ion batteries, the cathode (positive electrode) is normally made of aluminum, and the anode (negative electrode) is copper. During charge and discharge, electron transfer occurs between the collector and active material. At this contact point, when the resistance of the active materials becomes significant between the collectors and the interface, the transfer of electrons is inefficient, causing a decrease in electric capacity. If the collector’s metal foil is too rough, it increases the resistance of the active material between the collectors and the interface, and reduces overall electric capacity.
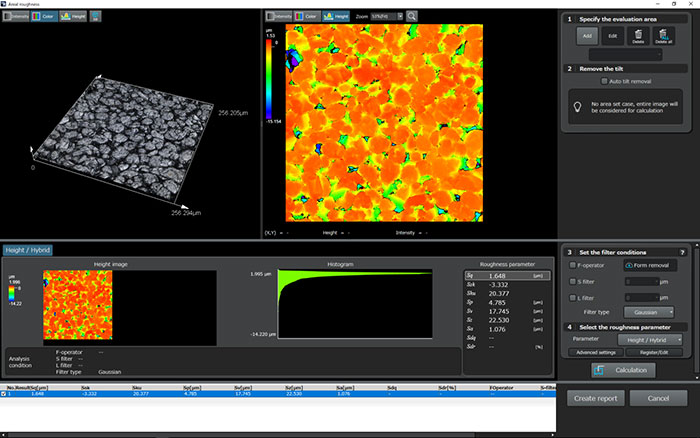
To help ensure that the batteries work properly, manufacturers measure the collectors’ surface roughness to make sure that it falls within a certain range. In the past, manufacturers used contact-type roughness measurers, such as a stylus, for this application. However, a stylus can only make linear roughness measurements, and it can potentially damage the fragile metal foil. Using a laser confocal microscope to measure the collectors, we were able to overcome these limitations while taking advantage of the additional benefits the microscope provided (figure 4).

Figure 4: The surface roughness of a current collector; the anode is copper, and the cathode is aluminum. |
Since laser scanning microscopes are noncontact, the foil will not get damaged during measurement. The microscopes can also make measurements across a plane rather than just on one line, providing better data over a wider area. To acquire data outside the microscope’s field of view, data can be stitched horizontally. The OLS5000 microscope’s stage had a driving range up to 300 mm × 300 mm, making it capable of measuring the roughness of a collector used in an automotive battery.
Conclusion
These two studies demonstrate the advantages that laser scanning confocal microscopes provide when inspecting lithium-ion battery electrodes. Recent technological advancements enable quality assurance professionals to achieve single-nanometer resolution. Since the microscopes use a noncontact laser to make measurements, the delicate samples will not be damaged during measurement. Lastly, the microscope’s stitching capabilities make it simple to investigate surface metrology over an area much larger than the microscope’s field of view.
As manufacturing continues to become more complex with more components put into smaller packages, laser scanning confocal microscopes will be an increasingly essential quality assurance tool.


